
TL;DR
Effective noise control in a closet rig hinges on proper placement and treatment. Moving your setup into a separate room is the best fix, but when that’s not possible, smart acoustic treatment and ventilation make all the difference. Focus on reflection points and airflow, and your sound will improve drastically.
Ever wonder why your voice sounds so boxy or your recordings pick up every squeak and echo? The truth is, tiny spaces like closets are a nightmare for sound. They create a perfect echo chamber, bouncing your voice and instrument sound around in a tight, cluttered space. But here’s the kicker: your biggest gains come from where you put the rig and how you treat the space — not just slapping foam everywhere.
This guide will reveal how to turn your cramped closet into a surprisingly good recording spot. We’ll cover the real game-changers — from moving your setup away from your ears to smart placement of acoustic treatments, and even how to keep your gear cool and quiet in a small room. If you want to learn more about acoustic dampening and placement, check out this detailed setup guide. If you want clear, natural recordings without sounding like you’re recording inside a cardboard box, keep reading.
Acoustic dampening
& the rig in the closet.
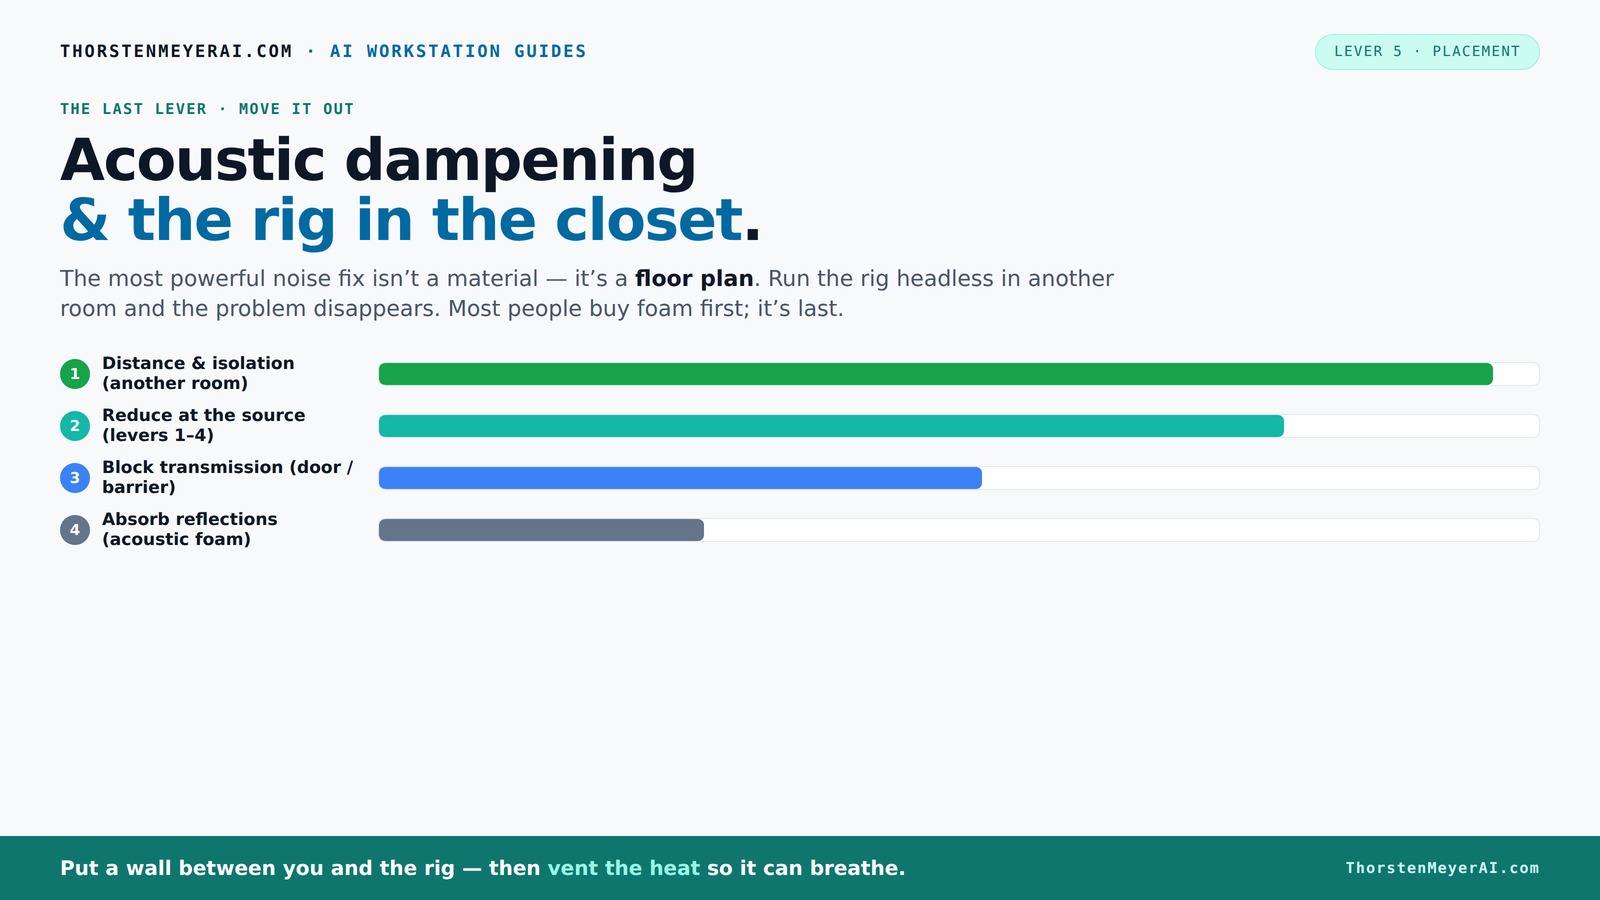
The most powerful noise fix isn’t a material — it’s a floor plan. A rig you can’t hear because it’s in another room beats any amount of foam. Tap the approaches in Part 1 to see what actually works.
(another room)
(levers 1–4)
(door / barrier)
(acoustic foam)
Contain the noise, not the heat
Key Takeaways
- Moving your rig into a separate room or closet drastically reduces noise and echo, often more than acoustic foam can.
- Proper ventilation is essential when placing a high-heat rig in a closet — passive vents and exhaust fans prevent overheating.
- Target reflection points — behind the mic, side walls, ceiling, and floor — with dense, thick absorption materials for best sound quality.
- Understand the difference between dampening and isolation; both are necessary for a clean, quiet setup.
- Use DIY, removable solutions like hooks and tension rods to create effective, rental-friendly treatment arrangements.

Focusound 52 Pack Acoustic Foam Panels 1" x 12" x 12" Sound Proof Foam Panles Soundproofing Noise Cancelling Wedge Panels for Home Office Recoding Studio with 300PCS Double-Side Adhesive
Soundproofing - Acoustic foam panels triangular grooves structure for better noise absorption, helps to reduce and absorb unwanted...
As an affiliate, we earn on qualifying purchases.
As an affiliate, we earn on qualifying purchases.
Why Moving Your Rig is the No.1 Noise Solution
Moving your setup into another room or closet is the most effective way to cut noise. Think of it this way: if you keep your powerful rig in a separate space, the sound doesn’t reach you at all. It’s like putting a wall between you and the noise source. You can then use a network connection or remote desktop to control it. For tips on creating an optimal environment, see acoustic treatment placement.
For example, a creator I know moved her noisy GPU rig to a basement closet. She keeps her quiet laptop on her desk. The difference? Night and day. The loud whirring fans and roaring GPU are now inaudible from her workspace. She records perfectly clean vocals without any treatment — because the noise isn’t there.
All you need is a good network connection and ventilation. No need to buy expensive foam or build a fancy booth. Just isolate the rig in a different room, and most of your noise headache vanishes.
Focusound 52 Pack Acoustic Foam Panels 1" x 12" x 12" Sound Proof Foam Panles Soundproofing Noise Cancelling Wedge Panels for Home Office Recoding Studio with 300PCS Double-Side Adhesive
Soundproofing - Acoustic foam panels triangular grooves structure for better noise absorption, helps to reduce and absorb unwanted...
As an affiliate, we earn on qualifying purchases.
As an affiliate, we earn on qualifying purchases.
How to Set Up a 'Rig in the Closet' That Won’t Overheat
Putting a powerful, heat-generating machine into a closet sounds perfect for noise — until it overheats. Trapped heat can turn your cozy closet into a sauna for your rig. The trick? Make sure it can breathe. You need active ventilation: a small exhaust fan, vent holes, or ducted airflow.
For instance, a YouTuber built a custom soundproof closet for his PC. He installed a quiet exhaust fan and vented air through a duct to the outside. His rig runs cool, and the noise is virtually silent. He even added a thermostat-controlled fan to keep temperatures steady.
Without airflow, your GPU can quickly hit 85°C or higher, throttling performance and causing fans to scream. To avoid that, consider these:
- Passive vents with mesh screens
- Quiet exhaust fans (look for 10-20 dB models)
- Temperature-controlled fans that turn on only when needed
Proper airflow isn’t just about comfort — it’s about maintaining the longevity and performance of your equipment. Overheating can lead to thermal throttling, system crashes, or hardware failure, which ultimately affects your work and your peace of mind. Ensuring adequate ventilation is a tradeoff worth making; for more on how to optimize your setup, visit acoustic dampening and ventilation tips.

2 Pack Studio Monitor Isolation Pads for Speakers 3-5 Inches Sound Insulation Studio Foam Prevents Vibrations Acoustic Speaker Isolation Pad High Density Fits Most Stands
Enhanced Sound Clarity: Saiqiang speaker isolation pads can reduce vibrations and resonance, providing cleaner, more accurate sound from...
As an affiliate, we earn on qualifying purchases.
As an affiliate, we earn on qualifying purchases.
Where to Place Acoustic Treatments for Maximum Effect
In a tiny closet, acoustic dampening isn’t just about sticking foam on every wall. It’s about targeting the right spots. The biggest reflection point? Behind the microphone. If your mic hears a wall behind it, you get that harsh, echoey sound.
For example, a singer in a closet added a thick panel directly behind her mic stand. The result? Her voice sounded fuller, less echoey. Then she placed blankets on the side walls to cut flutter echo, and a rug on the floor to tame reflections from the hard surface.
Effective placement of acoustic treatments means understanding how sound travels and reflects in small spaces. You want to intercept sound waves at their earliest bounce points before they create a muddy, reverberant mess. Dense materials like rockwool or heavy blankets absorb the high and mid frequencies most effectively when placed precisely where the sound bounces back into the mic. For more on optimal acoustic treatment placement, see acoustic dampening placement.

'Snap Studio' The Original Vocal Booth, Pro Sound Blankets, Portable Studio-Grade Recording, Sound Isolation, Trusted Globally By Professional Artists, Musicians, VO, Podcasters
#1 Recommended Portable Recording Booth — Featured by Rolling Stone Magazine as the “best sound booth”, Snap Studio’s...
As an affiliate, we earn on qualifying purchases.
As an affiliate, we earn on qualifying purchases.
The Big Difference: Absorption vs. Isolation — Why Both Matter
Acoustic dampening and soundproofing are related but not the same. Acoustic dampening reduces echo and harshness inside your space. Soundproofing stops sound from leaking out or coming in. In a closet, you need both, but they work differently.
For example, foam panels on the walls absorb sound reflections, making your recordings clearer. But to keep your neighbors from hearing your late-night sessions, you need a solid door with weatherstripping, or a soundproof blanket over the door.
Here’s a quick comparison:
| Type | What it does | Best use |
|---|---|---|
| Acoustic dampening | Absorbs internal reflections, reduces echo and boxiness | Improving sound clarity inside the room |
| Soundproofing/Isolation | Prevents sound from entering or leaving the space | Stopping noise leaks, keeping your rig quiet outside |
Understanding the distinction helps you make informed tradeoffs. For instance, if you prioritize internal clarity, focus on high-quality damping materials at reflection points. If external noise leakage is a concern, invest in sealing doors, adding mass to walls, or using soundproof curtains. For more insights on balancing absorption and isolation, visit dampening and isolation strategies.
How to Fix Common Closet Sound Problems — Boxiness, Echo, and Boom
Ever notice your closet recordings sound hollow, boomy, or like a box? That’s usually due to reflections bouncing between parallel surfaces or low-frequency buildup. The fix involves strategic placement of treatments and using different materials. For more on fixing common sound issues, see sound treatment techniques.
For example, in a tiny closet, adding dense bass traps in the corners reduces low-end resonance. Hanging thick blankets or moving quilts on side walls dampens flutter echo and harsh reflections. Also, positioning your mic slightly off-center helps avoid picking up the worst reflections.
Pro tip: Use a hand clap or a test recording. If you hear a ringing or echo, add more treatment to those reflection points. Experiment with placement until the sound feels tight and natural. Remember, small rooms tend to amplify certain frequencies—particularly bass—so addressing low-end resonance with bass traps is crucial for achieving a balanced sound. Overlooking these can leave your recordings with muddiness or boominess, undermining clarity and professionalism.
Smart, DIY, and Rental-Friendly Closet Studio Tricks
You don’t need to drill into walls or spend a fortune to improve your closet sound. Use removable solutions like autopoles, hooks, and clamp-mounted panels to set up treatments that can be moved or taken down.
For instance, a musician used tension-mounted curtain rods to hang blankets and foam panels. This kept his walls intact but still improved his sound. He also placed a portable, foam-lined enclosure around his mic, which could be taken down easily.
Other tips:
- Use non-permanent mounting options like command strips or suction cups for panels.
- Mix materials — blankets, rugs, foam — for best absorption at different frequencies.
- Invest in adjustable mic stands and flexible treatment mounts to fine-tune your setup.
These tricks save money, preserve your rental agreement, and allow you to experiment without permanent changes. The key is to understand that effective treatment doesn’t have to be permanent—strategic placement and removable solutions can provide significant improvements without damaging property or risking your deposit.
Frequently Asked Questions
Is acoustic dampening the same as soundproofing?
No, they serve different purposes. Acoustic dampening reduces echoes and reflections inside your space, making recordings clearer. Soundproofing, on the other hand, prevents sound from leaking out or coming in, keeping your rig quiet for neighbors or roommates.Where should I put acoustic panels in a closet booth?
Focus on reflection points: behind the mic, side walls, ceiling, and floor. Dense panels or blankets placed at these spots will dramatically improve your sound quality and reduce echo, especially in tiny rooms. Proper placement at these critical points ensures that sound waves are absorbed before they bounce around, preventing muddiness and harshness in your recordings. This targeted approach helps balance clarity and warmth, avoiding over-treatment that can deaden your sound or leave residual reflections that muddy your recordings.Do I need treatment behind the microphone or behind me?
Treatments behind the mic are most critical for controlling early reflections and capturing a tight sound. Placing absorbers behind you helps reduce room reflections that bounce back into the mic, making your voice sound more natural. Combining both approaches ensures your recordings are clear, natural, and free of unwanted room coloration. Consider that early reflection control directly in front of and behind the mic creates a more focused, professional sound, while side and ceiling treatments help tame the overall room reverb, especially in small, reflective spaces.How many panels do I need for a small closet?
It depends on the space, but generally 2-4 panels behind the mic, plus blankets or foam on side walls and ceiling, will make a noticeable difference. Use your ears as a guide — if it sounds hollow or echoey, add more treatment. Prioritize reflection points where sound bounces back into the mic, and consider bass traps in the corners if low-end boominess persists. Balancing absorption at these critical spots maximizes clarity while avoiding over-deadening the room.Should I use foam, blankets, or real acoustic panels?
A mix works best. Thick, dense panels or rockwool absorb low frequencies more effectively than thin foam, which is primarily good for mid and high frequencies. Blankets and rugs are quick, DIY solutions that can be easily moved or removed, making them ideal for rental situations. Combining these materials allows you to tailor your treatment to different frequency ranges, achieving a natural, balanced sound. The tradeoff involves considering space, budget, and the specific acoustic issues—using a layered approach often yields the best results without over-treating.Conclusion
In a small space, smart placement and targeted treatment beat throwing foam on every wall. Moving your rig away from your workspace is the cleanest fix — no treatment needed. When that’s not an option, focus on reflection points and airflow, and your recordings will sound clearer, bigger, and more professional.
Think of your closet as a tiny, controllable sound chamber — with a few tweaks, it can become your secret weapon for high-quality recordings. So, what’s your first step? Start with where your mic points and how your gear breathes. That’s where the real magic begins.