
Use this guide to clean a compatible hard floor with an electric floor scrubber and leave the machine ready for its next use. It is written for first-time operators and people familiar with basic cleaning who need a reliable operating sequence. Allow 30-60 minutes, including setup and cleanup; large or heavily soiled areas take longer.

Get cleaning gear delivered free with Prime
- Fast, free delivery on millions of items
- Prime Video, Amazon Music and more included
- Member-only deals all year
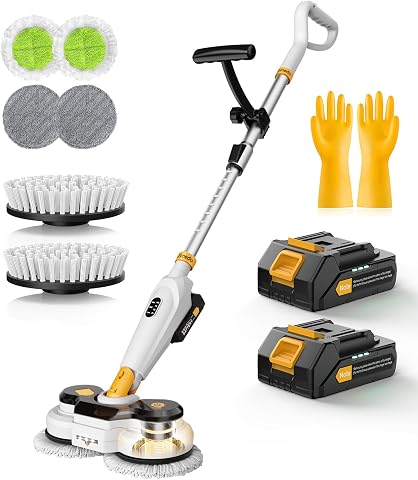
Cordless Electric Mop M3, 6000mAh, 2-in-1 Floor Scrubber & Spin Mop
- ✔ Brand: Qimedo
- ✔ Model: YD-QJS1804SS-PRO1
- ✔ Battery capacity: 6000 mAh

Bissell BigGreen BGFS650 Hercules Scrub & Clean Floor Machine – Green
- ✔ Manufacturer: Bissell BigGreen Commercial
- ✔ Model: BGFS650
- ✔ Brush speed: 2200 RPM

Cordless Electric Mop M3, 6000mAh, 2-in-1 Power Scrubber & Mops
- ✔ Brand: Qimedo
- ✔ Product type: Cordless electric mop and scrubber
- ✔ Battery capacity: 6000 mAh stated
Difficulty: Beginner | Time: 30-60 minutes, depending on floor size
What You’ll Need
Tools & Materials:
- Electric floor scrubber with the correct brush or pad
- Floor cleaning solution approved for the machine and floor
- Clean water, if the machine uses a solution tank
- Wet-floor signs or barriers
- Broom or vacuum
- Personal protective equipment specified by the machine manual and cleaning product label
- Clean cloths and a waste-water disposal point
Knowledge:
- Basic awareness of the floor material and its cleaning restrictions
- Ability to follow the scrubber controls and product label
- Ability to inspect a power cord or battery before use
Read the scrubber manual and cleaning product label before filling or operating the machine. Use only solutions and pads approved for both the floor and the scrubber. Check the floor-care instructions for delicate, coated, or water-sensitive materials. If you cannot confirm compatibility, ask the floor-care supplier before scrubbing.
Cordless Electric Mop M3, 6000mAh, 2-in-1 Floor Scrubber & Spin Mop
For buyers who want an electric scrubber that behaves like a floor mop, this Qimedo M3 has the clearest all-in-one setup in the group. Its 450 ml removable tank and built-in spray pump let us apply water as we clean, instead of stopping to reach for a separate spray bottle. Three settings, listed at 400, 600 and 800 RPM, give us a way to choose a gentler pace for routine passes or a faster one for more stubborn marks.Compared with the Hercules, the M3 is cordless and designed around mopping, so it is easier to picture for everyday kitchen or hallway cleaning. The tradeoff is that the Hercules lists a much higher brush speed at 2200 RPM and is explicitly presented as a bare-floor machine. The M3’s stated up to 420 minutes at low speed is generous on paper, but we should not assume it applies at 800 RPM. Its maker also says the head should not be submerged, which makes it less suitable for bathtub scrubbing than the other Qimedo listing.LED lighting, a display for battery percentage and mode, and a 50-inch telescoping handle all support reach and visibility during floor work. Those conveniences make this the most balanced floor-focused choice here, though the product description offers less attachment detail than the second M3. We would choose it for routine floor cleaning with controlled spray, and skip it if full immersion or a dedicated bare-floor polishing machine is the priority.
Pros:
- Three stated brush settings from 400 to 800 RPM
- Removable 450 ml tank with integrated spray pump
- 50-inch telescoping handle and LED light
- Display shows battery percentage and cleaning mode
Cons:
- The head is not suitable for submerging or tub use
- The 420-minute runtime claim applies to low-speed operation
- No brush attachment set is specified in this listing
Best for: Households seeking a cordless floor mop with adjustable brush speeds, integrated water spray and a long stated low-speed runtime.
Not ideal for: Buyers who need a scrubber head that can be submerged, or who prioritize the Hercules’s much higher listed brush speed for bare-floor work.
Bottom line: We rank this as the most balanced floor-mopping option because it pairs adjustable scrubbing with a built-in spray system, while its non-submersible head limits wet-area versatility.
“We rank this as the most balanced floor-mopping option because it pairs adjustable scrubbing with a built-in spray system, while its non-submersible head limits wet-area versatility.”
Bissell BigGreen BGFS650 Hercules Scrub & Clean Floor Machine – Green
The Hercules is the most machine-like pick in this roundup: a compact floor unit built around a 2200 RPM brush, an adjustable handle and an 8.5-pound listed weight. That combination may appeal when we want to move a scrubber around a bare-floor room without carrying a heavier upright. Its stated compatibility with Bissell floor polish also gives it a role beyond routine mopping, particularly for buyers seeking a high-sheen finish on suitable floors.Compared with either cordless Qimedo, the Hercules does not list a battery, runtime, spray tank or mop-style cleaning modes. That makes it a more specialized choice rather than a direct substitute for a cordless spray mop. Its compact 11 by 8 inch footprint may help in tighter spots, but the supplied information does not explain the included cleaning accessories or how the machine handles different floor finishes. We should confirm that the intended bare-floor surface is appropriate before using polish.The key limitation is firm: this model is not intended for carpet. That narrow surface fit keeps it below the more adaptable Qimedo options for whole-home versatility, but for someone focused on compact bare-floor scrubbing and polishing, the faster stated brush speed is the distinguishing reason to consider it. It is less compelling if we want cordless reach, water dispensing or a tool that can move between floor and wet-area tasks.
Pros:
- 2200 RPM stated brush speed
- Listed weight of 8.5 pounds
- Compact 11 by 8 inch footprint
- Designed to work with Bissell floor polish for a high-sheen finish
Cons:
- Designed primarily for bare floors and not suitable for carpet
- No battery, runtime or water-tank details are provided
- Its polishing focus is more specialized than the Qimedo mop setups
Best for: Buyers focused on compact cleaning and polishing of bare floors who want a lightweight machine with a high stated brush speed.
Not ideal for: Homes where carpet cleaning is needed, or shoppers looking for cordless operation, built-in spray or multi-surface bathroom attachments.
Bottom line: We place the Hercules as the compact bare-floor specialist: its stated brush speed and polish compatibility are distinctive, but its surface limits make it less versatile than either cordless Qimedo.
“We place the Hercules as the compact bare-floor specialist: its stated brush speed and polish compatibility are distinctive, but its surface limits make it less versatile than either cordless Qimedo.”
Cordless Electric Mop M3, 6000mAh, 2-in-1 Power Scrubber & Mops
This Qimedo M3 listing is the more versatile wet-area pick. It shares the other M3’s 400, 600 and 800 RPM modes, 6000 mAh battery claim and stated low-speed runtime of up to 420 minutes, but its headline difference is a brush head described as IPX7 waterproof. The listing says the head can be immersed and supplies eight attachments: four soft-bristle brushes and four replaceable cloth brushes. That gives it a clearer bathtub and bathroom role than the tank-equipped M3, whose head should not be submerged.Its adjustable 49-inch handle and angled head are intended to make floor, wall and reach cleaning easier without as much bending. The product description also identifies grout as a recommended surface. Compared with the Hercules, this is a cordless, multi-attachment tool rather than a compact bare-floor polishing machine; the Hercules has a higher listed brush speed, while the Qimedo’s claimed immersion capability and brush variety offer broader task coverage.There are reasons to be cautious about treating the two Qimedo listings as interchangeable. The supplied description for this version says it includes two batteries, while the adjacent M3 listing specifies a single 6000 mAh battery pack; the details also vary around included equipment and water handling. We would verify the exact package and care instructions before buying. Its attachment count is useful in principle, but more brush types do not guarantee the right material for every delicate floor, so surface compatibility still matters.
Pros:
- Three listed speeds up to 800 RPM
- Description claims an IPX7 sealed brush head for immersion
- Includes eight brush and cloth attachments
- Adjustable handle and angled head support reach
Cons:
- Battery package details differ from the other M3 listing and should be confirmed
- No water tank capacity is specified for this listing
- Attachment versatility requires checking brush suitability for each surface
Best for: Buyers who want one cordless handle for floor mopping, grout and wet-area scrubbing, and value having multiple brush and cloth attachments.
Not ideal for: Shoppers wanting a clearly specified integrated spray tank, a dedicated bare-floor polishing machine or a single unambiguous battery configuration.
Bottom line: We recommend this M3 over the tank-equipped version when wet-area reach and attachment choice matter most, while its less consistent package details call for closer listing checks.
“We recommend this M3 over the tank-equipped version when wet-area reach and attachment choice matter most, while its less consistent package details call for closer listing checks.”
As an Amazon Associate we earn from qualifying purchases.
Before You Start
Move people and movable items out of the work area. Set wet-floor signs at entrances and block access where needed. Plan a route that ends near an exit without trapping you behind the machine. If the scrubber has a power cord, locate outlets and route the cord behind you, away from the brush, wheels, and wet areas. Do not operate damaged equipment or use it where the manual prohibits wet cleaning.
Step-by-Step Instructions
Step 1: Check the floor and clear the area
Identify the floor material and check whether its finish can tolerate mechanical scrubbing and the chosen solution. Remove rugs, cables, loose objects, and debris. Sweep or vacuum grit, dust, and larger particles so the brush does not grind them into the floor or become clogged.
Tip:Test the solution and pad on a small, inconspicuous area if the floor-care directions call for a compatibility test. Stop if the finish changes, becomes tacky, or shows scratches.
Check: The work area is clear, loose debris is removed, and the floor and cleaning method are compatible.
Step 2: Inspect the scrubber
Turn the machine off before inspection. Check the housing, handle, controls, wheels, brush or pad holder, tanks, and any hose for visible damage or blockages. For a corded machine, inspect the plug and cable for cuts or exposed wires. For a battery model, check the charge and confirm that the battery is seated as the manual directs. Attach the correct brush or pad securely.
Tip:Do not use a machine with a damaged cable, loose pad holder, leaking tank, or malfunctioning control. Arrange repair according to the manufacturer’s instructions.
Check: The machine is intact, the power source is ready, and the brush or pad is firmly attached.
Step 3: Prepare the cleaning solution
Check whether your machine requires solution in a tank or applies solution by another method. If it uses a tank, measure the cleaner and dilute it exactly as its label and scrubber manual specify. Add water and solution in the order the manual recommends, then close the cap securely. Do not mix cleaning products or add extra concentrate to compensate for heavy soil.
Tip:Too much cleaner can leave a sticky film, create excess foam, or interfere with recovery. Use the specified product and dilution.
Check: The correct solution is prepared at the labeled dilution, and the tank is closed without leaks.
Step 4: Set up the machine
Move the scrubber to the starting point while it is off. Adjust the handle to a comfortable position and confirm you can reach the controls without stretching. Fill or install the recovery tank if the model uses one, and check that its drain hose or lid is closed. Connect a corded machine to a suitable outlet, or switch on the battery model as directed by the manual.
Tip:Keep hands and clothing clear of the brush area. Follow the manual’s instructions for attaching accessories and starting the machine.
Check: The scrubber is positioned, its tanks and fittings are secure, and the power source is connected correctly.
Step 5: Scrub a small test area
Start the machine according to the manual and clean a small section in a straight, controlled pass. Apply solution only at the rate the machine specifies. Do not force the scrubber or hold it stationary with the brush running. Turn off the brush before lifting or moving the machine across a surface where it could leave marks.
Tip:If the machine pulls, vibrates unusually, leaks, or leaves visible scratches, stop it and investigate before continuing.
Check: The machine runs steadily, the test patch shows no damage, and the soil is loosening without excessive liquid or foam.
Step 6: Clean the floor in overlapping passes
Work in manageable lanes, moving at a steady walking pace. Overlap each pass slightly so narrow strips are not missed. Follow the manual for brush direction and solution flow, and use a consistent route toward the exit. For stubborn soil, make another controlled pass rather than pressing down or increasing the solution strength. Watch the cord if present and keep it behind you, clear of the brush and wet floor.
Tip:Do not flood the floor. If liquid pools, stop applying solution and use the machine’s recovery function or the approved method to remove excess water.
Check: The cleaned area has even coverage, no missed lanes, and no standing puddles.
Step 7: Recover remaining liquid and let the floor dry
If the scrubber has a vacuum or recovery setting, use it as the manual directs to collect dirty solution. Empty the recovery tank before it reaches its limit. If your model does not recover liquid, follow the floor-care instructions to remove excess solution safely. Keep signs and barriers in place until the floor is dry, and prevent foot or vehicle traffic while it is wet.
Tip:Drying time depends on airflow, temperature, floor material, and the amount of liquid used. Do not estimate safety by appearance alone; check the surface before reopening it.
Check: There is no visible standing solution, and the floor is dry before people return to the area.
Step 8: Turn off and clean the scrubber
Switch off the machine and disconnect it from power or remove the key if the manual directs. Empty and rinse the recovery tank at an approved disposal point; dispose of dirty solution according to the product label and local rules. Empty the solution tank if the manual requires it. Remove the brush or pad, rinse or discard it as appropriate, and wipe the machine dry. Keep water away from electrical connections and controls.
Tip:Wear the protective equipment specified for handling recovered solution. Do not pour it into a storm drain unless local guidance explicitly permits it.
Check: The tanks are empty or prepared for storage as directed, the brush or pad is clean, and the machine is free of visible residue.
Step 9: Store the machine safely
Coil the cord loosely without kinking it, or charge and store the battery as the manufacturer directs. Store the scrubber upright in a dry, secure place with the brush or pad removed if required by the manual. Leave tanks open only when the manual recommends it for drying. Return signs and barriers after the floor is fully dry.
Tip:Do not store a wet machine where freezing temperatures, heat, or moisture could damage it.
Check: The scrubber is clean, dry, and stored securely, and the area is open only when safe to use.
Common Mistakes to Avoid
- Using a pad or cleaner that is too aggressive for the floor finish. — Check the floor-care guidance and machine manual, then use an approved pad and solution. Test a small hidden area when directed.
- Adding extra concentrate or mixing products to tackle heavy soil. — Follow the cleaner label’s dilution exactly. Make another pass or use the manufacturer-approved method for stubborn residue.
- Moving too quickly or leaving gaps between passes. — Use a steady walking pace and overlap lanes slightly. Divide large floors into sections so coverage stays consistent.
- Leaving dirty solution in the tank or storing the machine with a damp pad attached. — Empty and rinse tanks and clean or remove the brush or pad after use, following the manual.
Troubleshooting
Problem: The scrubber will not start.
Solution: Switch it off, then check the plug and outlet or battery charge and seating. Check the manual for reset steps and inspect for a full recovery tank or engaged safety control. Do not bypass a safety feature; arrange service if it still will not start.
Problem: The machine leaves streaks or a sticky film.
Solution: Stop and check whether the solution is correctly diluted and approved for the floor. Empty and rinse the solution tank if needed, then make a pass with clean water only if the machine and floor instructions allow it. Clean or replace a dirty pad.
Problem: The floor remains wet or has puddles.
Solution: Stop adding solution. Check the recovery tank level, lid, hose, and vacuum setting for the causes listed in the manual. Empty the tank if full and collect remaining liquid using the approved method. Keep the area closed until dry.
Problem: The brush spins unevenly, makes unusual noise, or leaves marks.
Solution: Turn off and disconnect the machine before checking the brush or pad for trapped debris, wear, or poor attachment. Refit or replace it with an approved accessory. Stop using the machine and contact service if noise, vibration, or marking continues.
What Success Looks Like
The floor has even coverage with less visible soil and no new scratches, dull patches, sticky residue, or standing liquid. The floor is dry before access resumes. The scrubber is switched off, emptied and cleaned as directed, and stored safely with its brush or pad in the recommended condition.
Next Steps
Record any machine fault, unusually heavy soil, or repeated streaking so you can adjust the approved pad or cleaning schedule. Check brushes, pads, filters, squeegees, and batteries at the interval listed in the manual, and replace worn parts with compatible items. Repeat cleaning when the floor’s condition and site schedule call for it; seek a floor-care professional if the finish is damaged or the floor remains slippery after cleaning.
Frequently Asked Questions
Can I use an electric floor scrubber on any floor?
No. Check the flooring and finish guidance as well as the scrubber manual. Some surfaces are sensitive to water, chemicals, abrasion, or heat, and may need a different method.
How much cleaning solution should I use?
Use the dilution and fill level specified by the cleaner label and machine manual. More concentrate can leave residue, cause excess foam, or affect recovery.
Should I scrub a heavily soiled area faster or press down harder?
No. Keep a controlled pace and use another pass if the manual and floor-care instructions allow it. Do not force the machine or change the solution strength beyond the label directions.
When can people walk on the floor again?
Reopen the area only when the floor is dry and safe under your site’s rules. Drying time varies, so check the surface directly and keep wet-floor signs in place until then.
How should I dispose of the recovered solution?
Follow the cleaner label, site procedures, and local disposal rules. Do not assume recovered solution can go into a storm drain.